Tutorials.Showbie is easy to use and free. Here are some tutorials to guide you through the Showbie paperless classroom tool.
|
Showbie Video Tutorials
|
Showbie: IT 648 Tutorial
|
Showbie: Getting Started |
Using Showbie with Padlet |
|
|
|
Showbie Tutorial
Step One
Create a Showbie Account

|
1) Choose "I'm a Teacher" to create an account for your class. When students log in for the first time, they will click "I'm a Student." If you pay for a pro account, you can have parents click, "I'm a Parent" to sign up.
2) Enter your name, email, and a password. You can link your account to your Google Sign In or Microsoft 365 account. 3) If you are a Student or Parent, you will also enter the class code provided by your teacher. |
Step Two
Your Teacher Dashboard
Your Teacher Dashboard
|
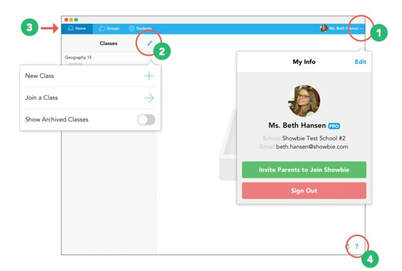
1) My Info Popover: Located at the top right of your web browser, this is where your profile is located. Here you can edit your information, change notification settings, and change your password settings.
2) Wrench Icon: Located on the at the right side of the sidebar on the left side of your screen. 3) Navigation Tabs: Teachers have 3 tabs located at the top left of the screen: Home, Groups, and Students. Groups is only available for Showbie Pro. Your Home tab displays your classes. The Students tab displays your students and their work. 4) Question Mark: Located at the bottom right of your screen, this question mark links to Showbie Support if you have a question or need help. |
Step Three
Setting Up Your Class
Setting Up Your Class

|
1) Select the Wrench icon menu (top)
2) Select "+" next to "New Class" 3) Name your class and click "Save." 4) When you create a class, a code appears below the class name. Students will use this code to sign up for your class. |
Step Four
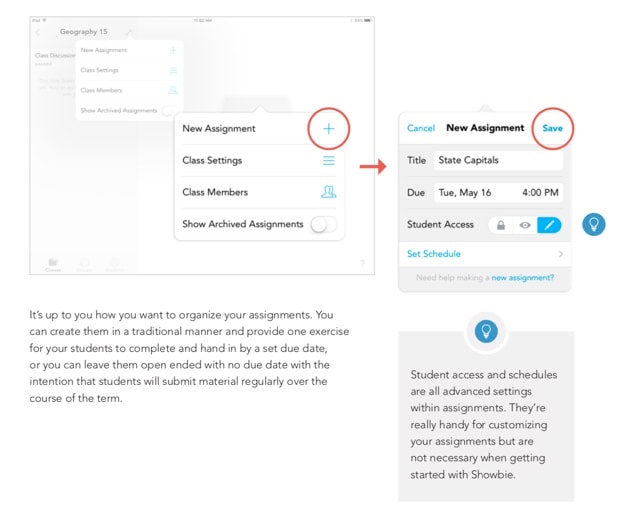
Create an Assignment
Classes are divided into Assignments. You can deliver assignments to the whole class or individual students. All student work will remain within their own student folder.
Create an Assignment
Classes are divided into Assignments. You can deliver assignments to the whole class or individual students. All student work will remain within their own student folder.
|
1) Click the wrench icon.
2) Select "+" next to "New Assignment" 3) Give the assignment at title, a due date if you want, and then click "Save." |
Step Five
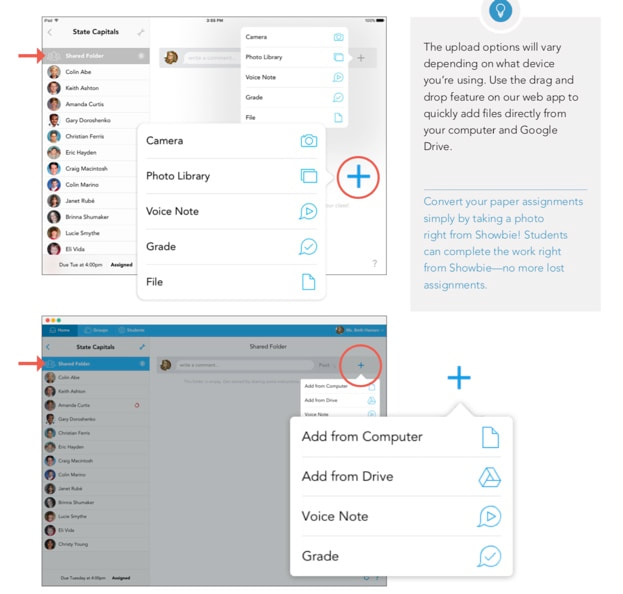
Add Materials for Students
Add Materials for Students
|
1) To add new Material, Click on "Shared Folder."
2) Post a comment or add a file to the whole class by clicking "Shared Folder." Send an assignment to an individual student by clicking on their Individual folder and adding it there. Student completed work will only appear in that student's folder, viewable only by the student and any teachers with access to your class. 3) Students will receive the file or comment and be able to respond to it individually, through text box, stylus writing, or audio clip. 4) You can add files from Drive, Microsoft 365, and Mac. You can add photos and videos. The possibilities for student assignments and materials through Showbie are as creative and endless as your imagination! |
Step Six
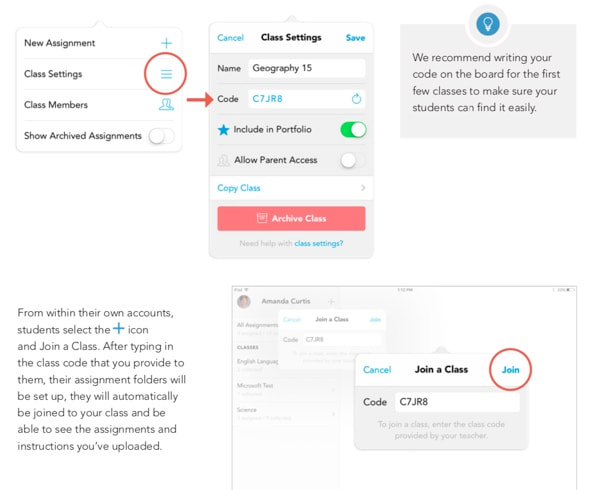
Adding Students
Now that you have set up your class and created an assignment, invite students to join your Showbie classroom.
Adding Students
Now that you have set up your class and created an assignment, invite students to join your Showbie classroom.
|
1) Students can sign up with just a user name and a password. It might be helpful for you to give them a user name and password to ease set-up. You can change their password at any time.
2) To join your class, students select the + icon and click "Join a Class." 3) Students should enter your class code. 4) To find your class code on the Teacher Dashboard: In the classes tab, click the wrench icon and select "Class Settings." You will see the class code here. |
Step Seven
Student Workflow Feedback
Student Workflow Feedback
|
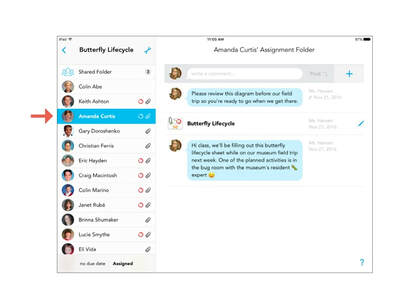
1) Click on each student's file to review and grade assignments and to provide individual feedback.
2) Click on "Shared Folder" to send whole class instructions and assignments. See the "Butterfly Lifecycle" assignment located in the student's assignments (see image). |
Step Eight
The Document Viewer
This is where work is completed and assessed in Showbie.
The Document Viewer
This is where work is completed and assessed in Showbie.
|
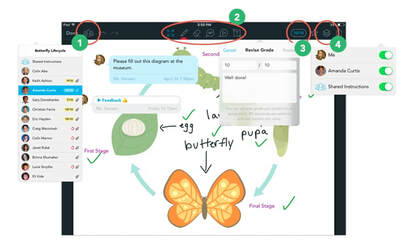
1) Quick marking: Use this icon to switch between students to grade an assignment.
2)Annotation Tools: Students will use these tools to complete assignments. Teachers will use these tools to grade assignments. Pen, voice notes, highlighters, and text boxes are available for feedback. 3) Grading and Feedback: Grading in Showbie is flexible. You can use a letter or number grade, an emoji, or just a comment. 4) Layers: You can choose what you see on student work by toggling on and off different layers of student work and feedback. |
Step Nine
Use Classroom Apps with Showbie
Use Classroom Apps with Showbie

|
1) Showbie is compatible with thousands of apps that allow students to create content on a tablet or iPad.
2) Click here to see a curated list of favorite apps used in Showbie classrooms. |
Step Ten
Resetting Student Passwords
Teachers can follow these steps to reset student passwords. If students have an email connected to their account, students can reset password with the "forgot my password" link on the sign in screen.
Resetting Student Passwords
Teachers can follow these steps to reset student passwords. If students have an email connected to their account, students can reset password with the "forgot my password" link on the sign in screen.
|
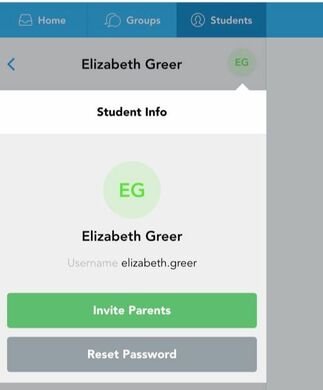
1) Click on the "Students" tab to see the list of your students.
2) Click the arrow to the right of the student's name 3) Click the student's photo/initial icon next to their name. 4) Click "Reset Password." |

